Dual Transfer Cases: Land Cruiser + NP203
Introducton:
With limited options for extra low range gears the new Advance Adapters (AA) NP203
conversion kit is long over due. This new kit mates the gear reduction section of the
NP203 transfer case to the front of a "four speed" Land Cruiser transfer case
giving a four to one low range. Adding a transfer case uses up drivetrain length. Moving
the engine forward may be a must for most applications. I removed my mechanical fan and
used a pusher fan that required extra modification to the front of the Cruiser. This
change resulted in a 4" savings that was used to keep the rear driveline from being
to short. The NP203 case will lengthen your drive train 6.5" with the SM465
transmission as compared to the stock AA SM465 adapter.
NP203 To Transfer Case Preparation:
The first part of the project is to obtain an NP203 transfer case. Be sure you get a
transfer case with the adapter for your transmission. You do not need the shifter
mechanism but you will have to make two less parts if you do get one. This unit is VERY
heavy and you won't be able to move it yourself.
 Next disassemble the two halves of the transfer case by removing the output shaft nut and
bearings. You will not need to remove the rear adapter or shaft to separate the two
halves. It is recommended that you have a manual for the NP203 on hand to refer to. Don't
worry about the roller bearings when they fall out in the rear half as you won't need
them. Once you have the two halves apart you can discard the little shifter connecting rod
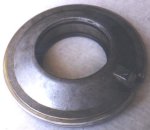
between the two cases. Carefully remove the main shaft and fish out the 15 needle bearings
for future use. Remove the thrust washer, gear, bearing, and cover from the shaft. Keep
these parts. Cut off half of the bump on the cover plate. Check
for clearance with the AA adapter.
Next disassemble the two halves of the transfer case by removing the output shaft nut and
bearings. You will not need to remove the rear adapter or shaft to separate the two
halves. It is recommended that you have a manual for the NP203 on hand to refer to. Don't
worry about the roller bearings when they fall out in the rear half as you won't need
them. Once you have the two halves apart you can discard the little shifter connecting rod
between the two cases. Carefully remove the main shaft and fish out the 15 needle bearings
for future use. Remove the thrust washer, gear, bearing, and cover from the shaft. Keep
these parts. Cut off half of the bump on the cover plate. Check
for clearance with the AA adapter.
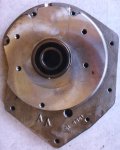
 Install the NP203 bearing and cover on the new shaft. Place the shaft bearing back in the
cover and retain with clip. Place the unit on the new shaft. File any burs on the old
NP203 gear that meshes with the gear on the new shaft. Test to see that it will mate with
the gear on the new shaft before you put it together. Grease the new shaft end hole to
retain the needle bearings during assembly. Be sure you have 15. Next slide the shaft assembly into
the NP203. Note placement of the gear set. Once assembled do not try to test shift the
NP203 gear as the unit will fall apart. Even installed in the truck the unit by design
will be hard to shift so you will not be able to test shift it out of the truck.
Install the NP203 bearing and cover on the new shaft. Place the shaft bearing back in the
cover and retain with clip. Place the unit on the new shaft. File any burs on the old
NP203 gear that meshes with the gear on the new shaft. Test to see that it will mate with
the gear on the new shaft before you put it together. Grease the new shaft end hole to
retain the needle bearings during assembly. Be sure you have 15. Next slide the shaft assembly into
the NP203. Note placement of the gear set. Once assembled do not try to test shift the
NP203 gear as the unit will fall apart. Even installed in the truck the unit by design
will be hard to shift so you will not be able to test shift it out of the truck.
Attaching The Adapter To The NP203:
 Attach the AA
adapter to the NP203. Lock tight is recommend for all bolts. Install the drain plug
NOW. You will need to use the vent at the top of the unit to fill the case with oil, so
don't put in the vent cap yet. It is recommended that you thread the vent cap hole and use
a hose nipple for future filling. You may need to cut a 1" access hole in the
transmission hump to access and fill the unit in the vehicle. Attach a long hose to allow
for placement of the end above any water that may be foraged.
Attach the AA
adapter to the NP203. Lock tight is recommend for all bolts. Install the drain plug
NOW. You will need to use the vent at the top of the unit to fill the case with oil, so
don't put in the vent cap yet. It is recommended that you thread the vent cap hole and use
a hose nipple for future filling. You may need to cut a 1" access hole in the
transmission hump to access and fill the unit in the vehicle. Attach a long hose to allow
for placement of the end above any water that may be foraged.
Combining The Two Transfer Cases:
 Combine the NP203 with the Land
Cruiser transfer case. Double check that the NP203 drain plug in the adapter is
installed. When putting the shaft through the case be sure to place the gears correctly.
Attach the new shaft nut.
Combine the NP203 with the Land
Cruiser transfer case. Double check that the NP203 drain plug in the adapter is
installed. When putting the shaft through the case be sure to place the gears correctly.
Attach the new shaft nut.
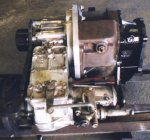
Assembled, the components are (left to right): 1) AA rear transfer case mount, 2)
Toyota 1977 FJ-40 "4 speed" transfer case, 3) AA adapter (silver), 4) NP203
transfer case gear box section (redish), 5) NP203 factory SM465 adapter (bright black).
Note the round object at the center of NP203... it is the shifter bolt for the NP203.
Shifter Mounting Bracket:
Attach the new shifter mount bracket to the NP203 with the transmission adapter bolts.
It was fabricated from angle iron with flat bar welded to it for the NP203 shifter.
Attaching Dual Cases To The Transmission:
Attach the NP203 to the transmission. In my case, the transmission was in the Cruiser.
You have two choices for supporting this assembly. First is the AA support that attaches
to the rear of the transfer case. The second is a custom support for the NP203. The latter
has a support mount built in. Check for driveline angles etc. In this case, the engine was
moved forward the exact amount that this new application extended the drive train so the
original drive lines and mount could be used.
Shifter Installation :
 The Cruiser transfer case shifter assembly will be attached to the NP203
with a fabricated bracket
(drawing).
Note that this bracket will also be used for the shifting the NP203. Attach the Toyota
shifter first. The bracket on the NP203 that shifts the shaft may need to be shortened so
that it clears the cases.
The Cruiser transfer case shifter assembly will be attached to the NP203
with a fabricated bracket
(drawing).
Note that this bracket will also be used for the shifting the NP203. Attach the Toyota
shifter first. The bracket on the NP203 that shifts the shaft may need to be shortened so
that it clears the cases.
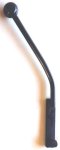 Attach the old shifter linkage rod to the NP203 and the shifter. It will
need to be reshaped to fit properly. The design with the linkage was chosen to move the
NP203 shifter forward of the Toyota case shifter and to reduce its length of throw. This
will keep them from hitting each other and allow for a boot to cover them. You may find
that another method will work better for your application.
Attach the old shifter linkage rod to the NP203 and the shifter. It will
need to be reshaped to fit properly. The design with the linkage was chosen to move the
NP203 shifter forward of the Toyota case shifter and to reduce its length of throw. This
will keep them from hitting each other and allow for a boot to cover them. You may find
that another method will work better for your application.
The dual shifter boot was purchased at Capitol Jeeper's Supply in Sacramentoa,
California. Ask Gary for the offset dual shifter boot that has square bases and he will
know which one you need.


