|
|
|
Land Cruiser FJ40 Spring Over Conversion * The pictures in this story are from several different conversions * This tech article is to help people understand how a spring over is done, and to show how it helps to improve ride and handling, and most importantly off road performance. These are not instructions or directions, just my methods on a spring over conversion. Although this conversion is done on an FJ40, the same can be said for Fj45's and FJ25's. Fj55's and Fj60's are very similar in design, although measurements would differ. Before getting started, here are a few things that you should consider replacing. Spring bushings, center pins, shackle pins, bolts, brake lines, U-bolts, Springs, U-joints, tie rod ends, and other steering parts. Sometimes all of these parts are in good shape, but other times there're all badly worn or broken. I would change the spring center pins no matter what. The first thing you want to do is remove the front axle and springs. Replace the center
pins with new ones in the opposite direction. This would be a fine time to power wash
these dirty parts! You might want to throw a couple of jack stands under the frame just
behind the rear spring hangers just for good measure. I'm not gonna tell you how to do
this though. I'm gonna show you how I do it. Some people preach how there's a right way to
build a Cruiser and a wrong way and I'm not gonna argue that there isn't a wrong way, but
there's not just one way. When your building something custom, your doing it the way you
want it! Not the way everyone else is doing it. I might let you know the way I feel about
certain ideas along the way though! Enough said!
If you're not doing a shackle reversal, then do not do cut off your spring hangers! If
you are however then get out the torch! Some people like to waste their time and use a
chisel to remove the frame rivets , this takes forever! Torch off the rivets and grind the
welds off the front hangers, then grab a large pry bar and rip the hangers off. I normally
destroy these in the process! Once their off, clean up the frame with a grinder. I have
seen that a lot of people like to take a lot of care in removing the front hangers so that
they can save the bushing sleeve, WHY? It's a waste of time trying to grind it off! You
can buy a piece of 11/4" pipe from your local metal shop, and cut to 2 �" You
can also get an exact size metric pipe if you search hard enough.
Now on to the rear hangers. These will be reused up front, so be careful. There are three rivets holding each hanger on and no welds. Carefully torch off just the heads of the rivets and then gently pry off the frame. Clean up frame and hangers with a grinder and then a wire wheel to ensure a good welding surface. OK, this is the part where a lot of people do things a little different. I have seen a
lot of different approaches at this, and some are good and some are bad. I feel that my
methods are simple and effective and have proven to work great. I do not extend the front
frame rails on my conversions, however, you will lose about an inch of wheel base by doing
it this way. I do flip the front springs around on certain setups. Usually for extreme
rock crawler type rigs By doing that you gain 3" of wheel base. On the Cruiser in
this article I'm not going to do this. I do not re-drill the spring pack, that I do think
is just stupid! By doing that, your just creating a weak link.
If your not doing a shackle reversal, you can with stock springs just set your new spring perches at the same caster as stock, and you'll be ready. However, with a shackle reversal you need to turn the pinion at 4 degrees positive. That's with a 4-5" shackle. A longer shackle will turn the pinion down more, so you might have to go another degree or two. But you want to maintain factory caster/camber for handling and drivability reasons. Stock caster/camber settings are 1 degrees positive. I recommend using Mopar or Moroso spring perches for Dana 60's. They are very stout. Do not use Confer! They are junk! They will crush. On the passenger side of the axle you will have to grind the spring perch almost flat on one side to make it level. To remove the u-bolt bracket from the frame, just grind off the welds, and pry off.
You do not have to cut and turn the knuckles if your using stock springs. If your going
with a large lift spring then you will have to. Some people just turn the pinion anyhow
but it will greatly effect the steering and handling in a bad way!
Once you've got the spring perches where they need to be, weld them up.
The hangers that you cut off the back of the frame will now go up front. I like to mount them flush with the end of the frame. The old rivet hole towards the front of the frame should be very close to a factory hole in the frame. You can put a bolt through it to help hold it in place along with a C-clamp. If you feel confident that you know what your doing, you can weld it all up. Otherwise you should wait until you get the rear shackle hanger welded in and then hang a spring and check for straightness. The rear shackle hanger hole should be cut center around the upper rivet that you cut off of the old rear hanger. You can buy a piece of metric pipe from a metal shop. Cut it to the same length as the stock one{ 2 �" } Mark the hole with soap stone or whatever, and cut. You can use a hole saw { 1 3/8" }, or torch it. Hole saws take forever but cut a perfect circle, which is what you need!
Once you have the hole cut out, slide the pipe {bushing sleeve} into the frame and check for straightness. I hang a stock shackle through it and put a small level on top of the bottom bolt and make adjustments from there. Once you've got it level, tack weld it in place. Then hang a leaf spring from front hanger to rear and check for straightness, levelness, etc….Then weld it all up. By the way, make sure you check behind the frame rails for fuel lines, and wiring! Now that you've got everything welded up and painted, you can put the front axle back under it. If you want a 3" longer wheel base, then mount your springs in a reverse fashion. (military wrap up front.)
For the front rubber brake line I just make a 3-4" drop down bracket that bolts to the frame. Now its time for the steering. I like to make a crossover type double steering arm. You can also purchase one of these from Fab-tech and I think there are a couple other companies out there now that make them. You can also use a 4" dropped Pitman arm or a custom bent drag link. I think the cross over is the best choice because it puts the drag link up over the springs parallel with the tie rod, which eliminates bump steer, and protects it from getting hit by rocks and such. However, if you are not a damn good welder, and don't understand the meaning of preheat, cast steel, heat range, disaster, and other words like that, then I would either take it to a professional weld shop to have it built, or buy one from one of the companies that manufactures it.
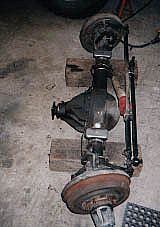
Rear axle. Support the vehicle with jack stands. Remove the rear axle. Its easiest to remove the shackle pins and spring hanger pins and brake lines then just drop the whole axle and springs out from under the cruiser.
Remove the leaf springs, and replace the center pins with new ones in the opposite direction. You can use the same spring perches as you used up front and then make shock mounts off to the side of the axle, or you can do it this way. Take 2.5" �" wall receiver tubing cut it at 6", and drill the center hole. Then weld a piece of �"x 2" flat bar { approx. 5 �" long } to the spring perch. You can buy shock mounts from your local 4x4 shop and drill out a hole at the far end of the shock mount plate and bolt it up. It looks real clean and is very strong. Not to mention that when mounted like this the shocks are almost out of harms way. To run a long shock, I move the upper shock mounts inward several inches on each side. This is also a good time to throw those rear discs on that you've been wanting so badly!
I only rotate the rear pinion 3-4 degrees. To much and you'll have lots of vibration and more likely to break a pinion with axle wrap which Land cruisers are notorious for having when sprung over. That is also why I make my spring perches 6" long and out of box tubing because axle wrap will crush the average spring perch. Also the longer perch helps reduce axle wrap. However, too long a perch and you'll have bent leaf springs!
Now you can bolt up the rear axle and springs. Your rear drive shaft should be long enough. You might need to lengthen it an inch or so though. The front drive shaft will have to be lengthened, it will fit, but will probably fall out when off-road The reason is that with the shackle reversal when the front suspension drops, the pinion drops downward now instead of upward which allows for the driveshaft to slip out. That's the price you pay for more flex I guess!
Pros and cons for a spring over Conversion Pros:
|