|
|
|
Ring and Pinion Install Tips What follows is a group of axle gear installation notes that I have
compiled that may be useful as a supplement to the assembly procedures found in the Toyota
service manual. Below is a simple drawing of the various ring & pinion components: CHECKING DISTANCE (CD) Should be set within about 0.002" of spec (etched on the face of the pinion gear) and is adjusted by placing shims behind the rear pinion bearing (or sometimes between the bearing race and case). Note that some manufacturers do not always machine their carrier bearing caps on exact center, but the Toyota ones I have worked on all seem to be machined on center. This helps greatly when wanting to measure checking distance, as the measurements can then be taken off the carrier bearing centerline with the bearing cap removed.
BACKLASH (BL) Overall, the backlash readings should not vary by more than about 0.002" around the circumference of the gear. It is generally not good for any backlash measurement to be less than the specified setup number (etched on the side of the ring gear). Looser backlash is more desirable than tighter backlash. For example, given 0.008" specified backlash, it would be acceptable to go as high as about 0.012" to 0.013" on some readings. It is best to watch backlash variation at 3 to 5 places around the ring gear.
DRIVE SIDE PATTERN This is the most important check for good setup. Pattern should be centered or 1/2 way in tooth depth. It is not good to have the pattern too far towards the top of the tooth or the root of the tooth. Pattern starts at toe of gear and extends toward heel as more load is applied. Under a no load condition, pattern should cover 1/3 to 1/2 gear width. (Use 0.002" to 0.003" shims to correct pinion height and improve pattern. Raising pinion, or reducing checking distance, moves pattern towards heel, and vice versa.)
COAST SIDE PATTERN If the drive side pattern looks good, the coast side pattern will almost always be fine. However, this pattern may ride a bit deeper in the root of the ring gear.
RING GEAR BOLTS Care should be taken when loosening and tightening stock Toyota ring gear bolts. They appear to be made of fairly soft steel and may strip easily. If in doubt, use new ring gear bolts. Do not over-torque ring gear bolts. Also, ensure the ring gear and carrier surface are spotlessly clean before assembly to prevent any debris from becoming trapped under the gear and causing misalignment.
RING/PINION GEARS Gears are machined at the factory as a matched set. Be careful to never mix gear sets.
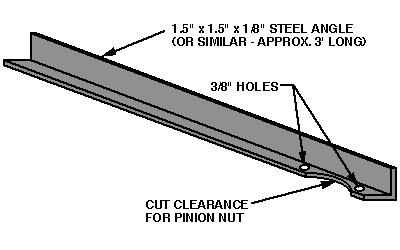
TOOLS When working on Toyota gears, there are several homemade tools that can make the job a bit easier. When working on a 3rd member, it is convenient to have the unit sitting with the pinion flange pointed down. This allows you to easily work on setting up the gears as they are now topside. To support the 3rd member, take a piece of plywood and cut an opening in it just a bit smaller than the outside of the 3rd member flange. Then find a way to support this piece of plywood horizontally (maybe a 5 gallon bucket with a hole in the side) and set the 3rd member down into it. Now you can access all the gear adjustments and support the 3rd member so that the pinion flange can be turned when needed. When loosening or tightening the pinion nut, it is helpful to have a way of holding the pinion flange while turning the nut with a socket. The tool shown below can be used to do just such a job.
I hope you find these notes useful. The factory manual provides a good description on how to set up gear sets, but the details listed here provide a little more info not found in the manual. Jay
Copyright © 1997 by Jay Kopycinski, All Rights Reserved. |